He knows most who speaks least.
大智若愚
Updated time: 06/23 2026.
科学计算与分子模拟软件的安装:Lammps、VASP、Phonopy、N2P2。
Lammps - Debian 12.5
Ref:
LAMMPS 的源代码安装相对复杂,因为它可以根据需要配置各种选项和扩展。下面是使用 CMake 进行安装的一种常规方法,包括了一些可能需要的依赖项如 FFTW 和 MPICH。
安装
1. 安装前准备
首先,确保你的系统上安装了编译工具和 CMake。另外,对于并行计算支持,你可能需要安装 MPI 实现,如 MPICH 或 OpenMPI。
sudo apt-get update
sudo apt-get install build-essential cmake git
sudo apt-get install mpich libmpich-dev
sudo apt-get install openmpi-bin openmpi-common libopenmpi-dev
mpirun --version
如果你打算使用 FFTW (用于更快的傅里叶变换),你也需要安装 FFTW 库:
sudo apt-get install libfftw3-dev libfftw3-double3
2. 获取 LAMMPS 源代码
从 GitHub 克隆 LAMMPS 的仓库:
git clone -b stable https://github.com/lammps/lammps.git lammps
cd lammps
这里我们选择了稳定版分支,但你也可以选择其他分支,如开发版等。
3. 使用 CMake 配置构建
创建一个构建目录并进入:
mkdir build
cd build
运行 CMake 来配置构建过程。你可以根据需要启用或禁用特定的包或功能:
cmake ../cmake -D PKG_MPI=yes   # configuration reading CMake scripts from ../cmake
cmake --build .                 # compilation (or type "make")
# cmake ../cmake -DCMAKE_INSTALL_PREFIX=/path/to/install/lammps
这里的 /path/to/install/lammps 应该被替换为你希望安装 LAMMPS 的目录。你可以添加额外的 CMake 选项来启用或禁用特定的 LAMMPS 包,例如:
-DPKG_MANYBODY=yes -DPKG_MOLECULE=yes
#test
/build/lmp -h
4. 编译和安装
编译 LAMMPS:
make -j4 # 使用4个核心进行编译,根据你的处理器调整这个数字
安装 LAMMPS:
make install
5. 测试安装
确保 LAMMPS 已正确安装,可以运行下面的命令测试:
/path/to/install/lammps/bin/lmp -h
这应该会显示 LAMMPS 的帮助信息,证明安装成功。
After the initial build, whenever you edit LAMMPS source files, enable or disable packages, change compiler flags or build options, you must re-compile and relink the LAMMPS executable with cmake --build . (or make). If the compilation fails for some reason, try running cmake . and then compile again. The included dependency tracking should make certain that only the necessary subset of files is re-compiled. You can also delete compiled objects, libraries, and executables with cmake --build . --target clean (or make clean).
6. 修改
在使用 ccmake . 进行配置时,退出 ccmake 的界面操作比较简单:
- 保存并生成配置:如果您已经进行了配置修改并希望保存这些更改,并生成用于编译的
Makefile:- 按下
c键以配置参数,可能需要多次按c直到所有配置问题解决并出现[g]enerate的选项。 - 完成配置后,按下
g键来生成Makefile并退出ccmake。
- 按下
- 退出而不保存更改:如果您想退出而不保存所做的更改:
- 按下
q键。如果您没有进行任何未保存的更改,这将直接退出ccmake。 - 如果您已经修改了配置但还未保存,系统会询问您是否真的要退出。此时,再次按
q确认退出而不保存更改。
- 按下
总的来说,ccmake 的操作主要通过界面底部的提示进行,按键操作直接响应于提示的指令。
修改配置
1. 打开 CMake 配置
首先,您需要进入到 LAMMPS 的源代码或构建目录,并使用 CMake 来修改现有配置。
使用命令行界面
如果您在终端中,可以使用 ccmake(面向字符的界面)或 cmake-gui(图形界面):
cd /path/to/lammps/build
ccmake .
# 或者
cmake-gui .
在 ccmake 界面中:
- 按
t切换到高级视图。 - 使用键盘上下箭头选择要启用的包(包名称以
PKG_开头)。 - 按
Enter改变选项(ON/OFF)。 - 一旦完成配置,按
c进行配置,然后按g生成并退出。
在 cmake-gui 中:
- 修改包的选项,将它们从
OFF改为ON。 - 点击 “Configure”,然后 “Generate”。
修改 CMake 文件
或者,您可以直接编辑 CMake 命令行选项,在终端中运行:
cd /path/to/lammps/build
cmake -DPKG_MANYBODY=ON -DPKG_MOLECULAR=ON ..
上述命令启用了 MANYBODY 和 MOLECULAR 包。您可以根据需要启用更多包。
2. 重新编译 LAMMPS
配置完成后,重新编译 LAMMPS:
make -j $(nproc)
这里的 -j $(nproc) 选项允许并行编译,加快编译过程。$(nproc) 命令会自动替换为您系统中的处理器核心数。
3. 安装(可选)
如果您之前安装了 LAMMPS(通过 make install),则需要再次安装来更新安装的二进制文件:
make install
4. 验证
验证新包是否正确安装,可以运行:
/path/to/lammps/build/lmp -info
查看输出,确认新包已列出。
这些步骤将指导您通过添加所需的 LAMMPS 包来自定义您的模拟环境。
安装python包
2.2. Installation — LAMMPS documentation
To specify a virtual environment when installing LAMMPS using CMake, follow these steps:
1. First, create and activate your virtual environment:
python3 -m venv ~/myenv
source ~/myenv/bin/activate
2. When configuring LAMMPS with CMake, set the CMAKE_INSTALL_PREFIX to point to your virtual environment:
cmake -DCMAKE_INSTALL_PREFIX='~/mysoft/env/mydft' ../cmake
3. Build and install LAMMPS:
cmake --build . --target install
4. You can also install the Python package with:
make install-python
This approach ensures that LAMMPS and its Python module are correctly integrated into your virtual environment.
安装Vorinoi/KIm 包
3.7. Packages with extra build options — LAMMPS documentation
Very easy using CMAKE.
Lammps - ZC-M6
安装
source /public3/soft/modules/module.sh
module list
module purge
module load cmake/3.24.1
module load gcc/12.2
module load mpi/intel/17.0.7-thc
module load fftw/3.3.8-mpi

cd lammps                # change to the LAMMPS distribution directory
mkdir build; cd build    # create and use a build directory
# configuration reading CMake scripts from ../cmake
# 已安装的N2P2使用intel编译器,而lammps不是,所以这里用内置的命令安装ML-HDNNP
cmake \
  -C ../cmake/presets/most.cmake \
  -C ../cmake/presets/nolib.cmake \
  -D CMAKE_C_COMPILER=/public3/soft/gcc/12.2/bin/gcc \
  -D CMAKE_CXX_COMPILER=/public3/soft/gcc/12.2/bin/c++ \
  -D CMAKE_Fortran_COMPILER=/public3/soft/gcc/12.2/bin/gfortran \
  -D FFTW3_INCLUDE_DIR=/public3/soft/fftw/3.3.8-mpi/include \
  -D FFTW3_LIBRARY=/public3/soft/fftw/3.3.8-mpi/lib/libfftw3.so \
  -D PKG_VORONOI=on \
  -D DOWNLOAD_VORO=on \
  -D PKG_ML-HDNNP=on \
  -D DOWNLOAD_N2P2=on \
  ../cmake
# -D N2P2_DIR=/public3/home/scg6928/mysoft/tools/n2p2/2.3.0/n2p2-2.3.0 \

cmake --build .          # compilation (or type "make -j 4" 不要用太多核并行)
cmake --build . --parallel 4

# 查看所有可选项
cmake -L
cmake -LAH
Python
# 成功安装
# dft virtual environment
source ~/path/to/venv/bin/python
# 注意路径指向lib的父级目录
cmake  -D CMAKE_INSTALL_PREFIX=/public3/home/scg6928/mysoft/env/pyenv/dft/ -D BUILD_SHARED_LIBS=on .

cmake --build . --parallel 4 # make -j 4
make install-python
VASP
6.3.2 (5.4.4 装不了)
Install intel Base/HPC toolkit
VASP 5.4.4编译与安装 - 知乎 (zhihu.com)
甚至可以用apt安装,但是我们需要自行编译 fftw,以及用apt安装的无法调用 icc 命令,应该是环境配置不对
hdf5
编译支持HDF5的VASP - 哔哩哔哩 (bilibili.com)
- 安装HDF5
下载HDF5及相关的SZIP和ZLIB,链接如下
ZLIB: https://www.zlib.net/zlib-1.2.11.tar.gz
SZIP: https://support.hdfgroup.org/ftp/lib-external/szip/2.1.1/src/szip-2.1.1.tar.gz
HDF5: https://www.hdfgroup.org/downloads/hdf5/source-code/
安装HDF5 和VASP 的编译器必须一致
- 安装
export CC=icc
export CXX=icpc
export FC=ifort
export CFLAGS='-O3 -xHost -ip'
export CXXFLAGS='-O3 -xHost -ip'
export FCFLAGS='-O3 -xHost -ip'
tar -zxvf szip-2.1.1.tar.gz
cd szip-2.1.1
./configure --prefix=~/bin/szip
make
make check
make install

tar -zxvf zlib-1.2.7.tar.gz
cd zlib-1.2.7
./configure --prefix=~/bin/zlib
make
make install

tar -zxvf hdf5-1.8.8.tar.gz
cd hdf5-1.8.8
./configure --prefix=~/bin/hdf5 --enable-fortran --with-szip=~/bin/szip --with-zlib=~/bin/zlib
make
make install
- VASP编译
修改makefile.include,添加
#HDF5-support (optional but strongly recommended)
CPP_OPTIONS+= -DVASP_HDF5
HDF5_ROOT  ?= ~/bin/hdf5
LLIBS      += -L$(HDF5_ROOT)/lib -lhdf5_fortran
INCS       += -I$(HDF5_ROOT)/include
make DEPS=1 -j16 all
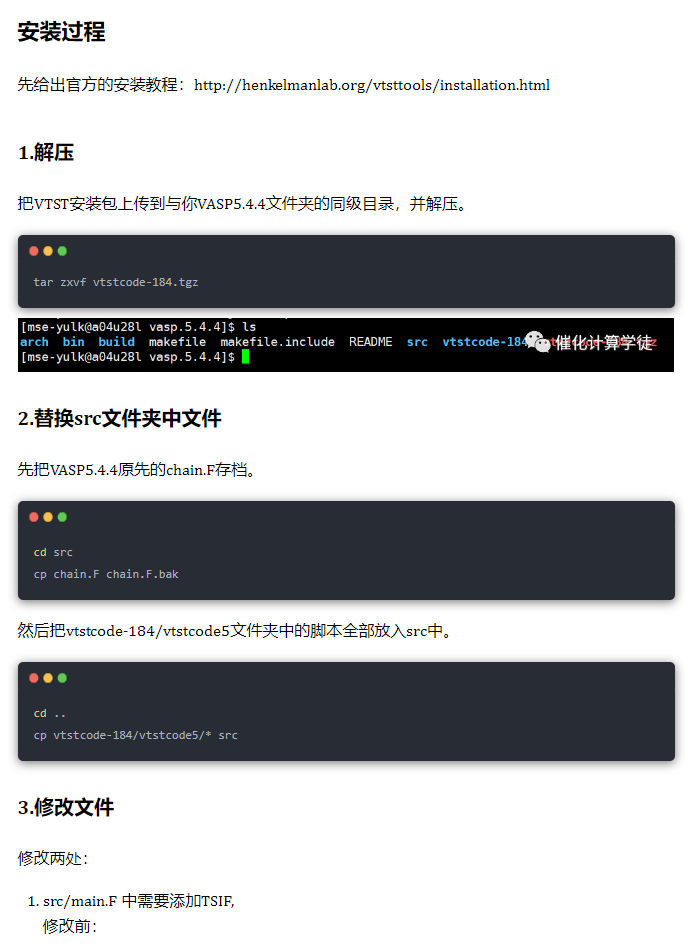
5.4.4+VTST+Yin patch
Ref:
http://bbs.keinsci.com/thread-11111-1-1.html
https://mp.weixin.qq.com/s/yEMI2VjzW_kLx_TpDpxM3w

Yin patch涉及以下几个文件
- CONSTR_CELL_RELAX.F: VTST不修改
- DYNA.F: VTST不修改
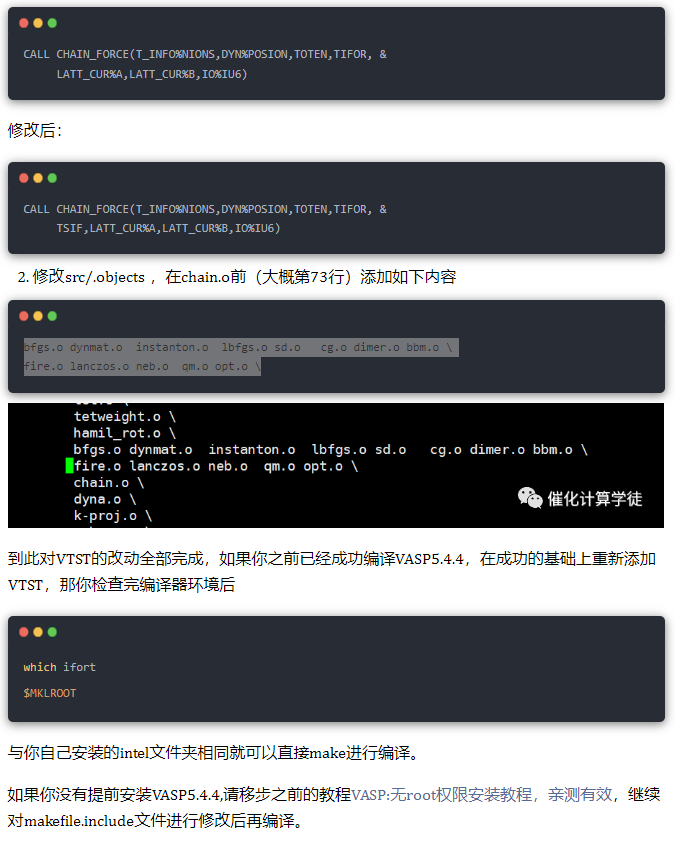
- MAIN.F: VTST修改的是3146,3147行,且行数没有变化。Yin Patch修改的是3556-3563行。
- .objects: VTST修改的是73行chain.o后面添加。不影响前面的行数。Yin patch修改的是19-25行,添加了y_max_force.o编译。
- y_max_force.F: 新增的文件。
所以,可以在做完VTST的修改之后,再打Yin patch补丁。
In vasp root directory:
patch -p1 < supercell_constraint/mypatch
Phonopy
Conda
conda create -n phonopy -c conda-forge
conda activate phonopy
conda install -c conda-forge phonopy
phonopy
export PATH=$(which python):$PATH 后续发现不添加PATH也可以
Pyvenv
python -m venv ~/mysoft/env/pyenv/phonopy
source activate ~/mysoft/env/pyenv/phonopy/bin/activate
phonopy
不需要添加PATH
N2P2
Debian 12.5
sudo apt update
sudo apt install -y build-essential make g++ libeigen3-dev libopenmpi-dev libblas-dev libgsl-dev

sudo nano /etc/apt/sources.list
# 清华大学 Debian 镜像
deb https://mirrors.tuna.tsinghua.edu.cn/debian/ bookworm main contrib non-free non-free-firmware
deb-src https://mirrors.tuna.tsinghua.edu.cn/debian/ bookworm main contrib non-free non-free-firmware

# 安全更新
deb https://mirrors.tuna.tsinghua.edu.cn/debian-security/ bookworm-security main contrib non-free non-free-firmware
deb-src https://mirrors.tuna.tsinghua.edu.cn/debian-security/ bookworm-security main contrib non-free non-free-firmware

# 更新仓库
deb https://mirrors.tuna.tsinghua.edu.cn/debian/ bookworm-updates main contrib non-free non-free-firmware
deb-src https://mirrors.tuna.tsinghua.edu.cn/debian/ bookworm-updates main contrib non-free non-free-firmware

cd n2p2/src/
make -j 4
使用gnu编译器,intel编译器GCC12不兼容
超算ZC-M6
source /public3/soft/modules/module.sh
module list
module purge
# module load intel/17.0.7-thc
module load eigen/3.8.8-cyc
module load gsl/2.5-cjj
module load mpi/openmpi/2.0.4-gcc-4.9.0

# gnu 版本
scg6928@ln2:~$ g++ --version
g++ (GCC) 4.8.5 20150623 (Red Hat 4.8.5-44)
Copyright (C) 2015 Free Software Foundation, Inc.
This is free software; see the source for copying conditions.  There is NO
warranty; not even for MERCHANTABILITY or FITNESS FOR A PARTICULAR PURPOSE.


# 修改makefile 用 gnu编译
    15  # Default compiler (gnu/intel/llvm).
    16  COMP=gnu

# 添加 GSL library 地址
export LD_LIBRARY_PATH=/public3/soft/gsl/2.5/lib:$LD_LIBRARY_PATH
# 修改makefile.gnu 获取头文件地址
     3  ###############################################################################
     4  # EXTERNAL LIBRARY PATHS
     5  ###############################################################################
     6  # Enter here paths to GSL or EIGEN if they are not in your standard include
     7  # path. DO NOT completely remove the entry, leave at least "./".
     8  PROJECT_GSL=/public3/soft/gsl/2.5/include/
     9  PROJECT_EIGEN=/public3/soft/eigen/3.3.8-install/include/eigen3/

make && make clean-lammps-hdnnp
Please indicate the source when reprinting. Please verify the citation sources in the article and point out any errors or unclear expressions.